Tag Archives: development

Expired Tetenal C41 Kit meets Expired Kodak Portra 400

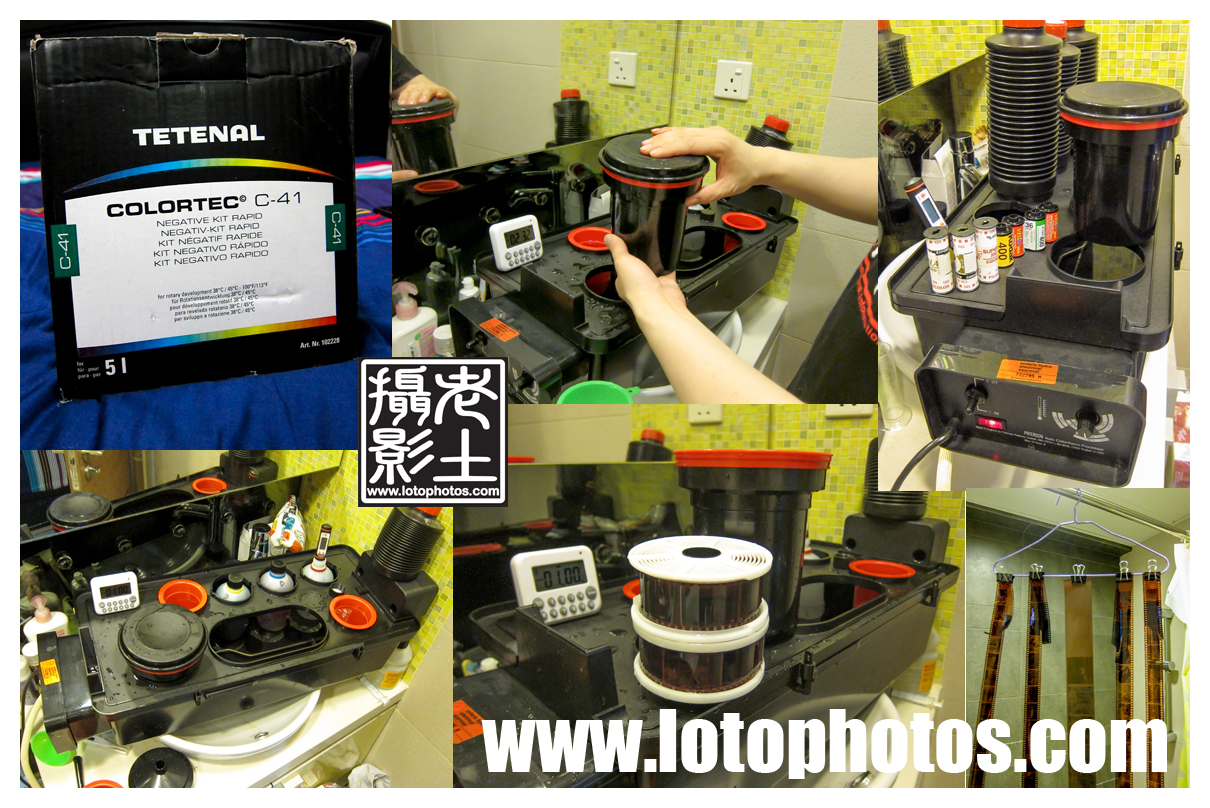
While cleaning up my photo gears, I see a box of Tetenal C41 kit that I got and opened a couple of years ago in Shanghai.  Since then, it made its way to Hong Kong and to San Francisco.  On arrival to SF, I discovered that one bottle of the Blix solution actually bursted and was leaking all over the box.  All these items were stored in a storage that was certainly quite hot (30C+) for months before making its way to the US.

I also found a few 4×5 film boxes of Kodak Portra 400 that I loaded about two years ago.  This is when expired chemicals meet expired film, a combination that has the word “disaster” written all over it.

Expired Tetenal C41
Expired Tetenal C41

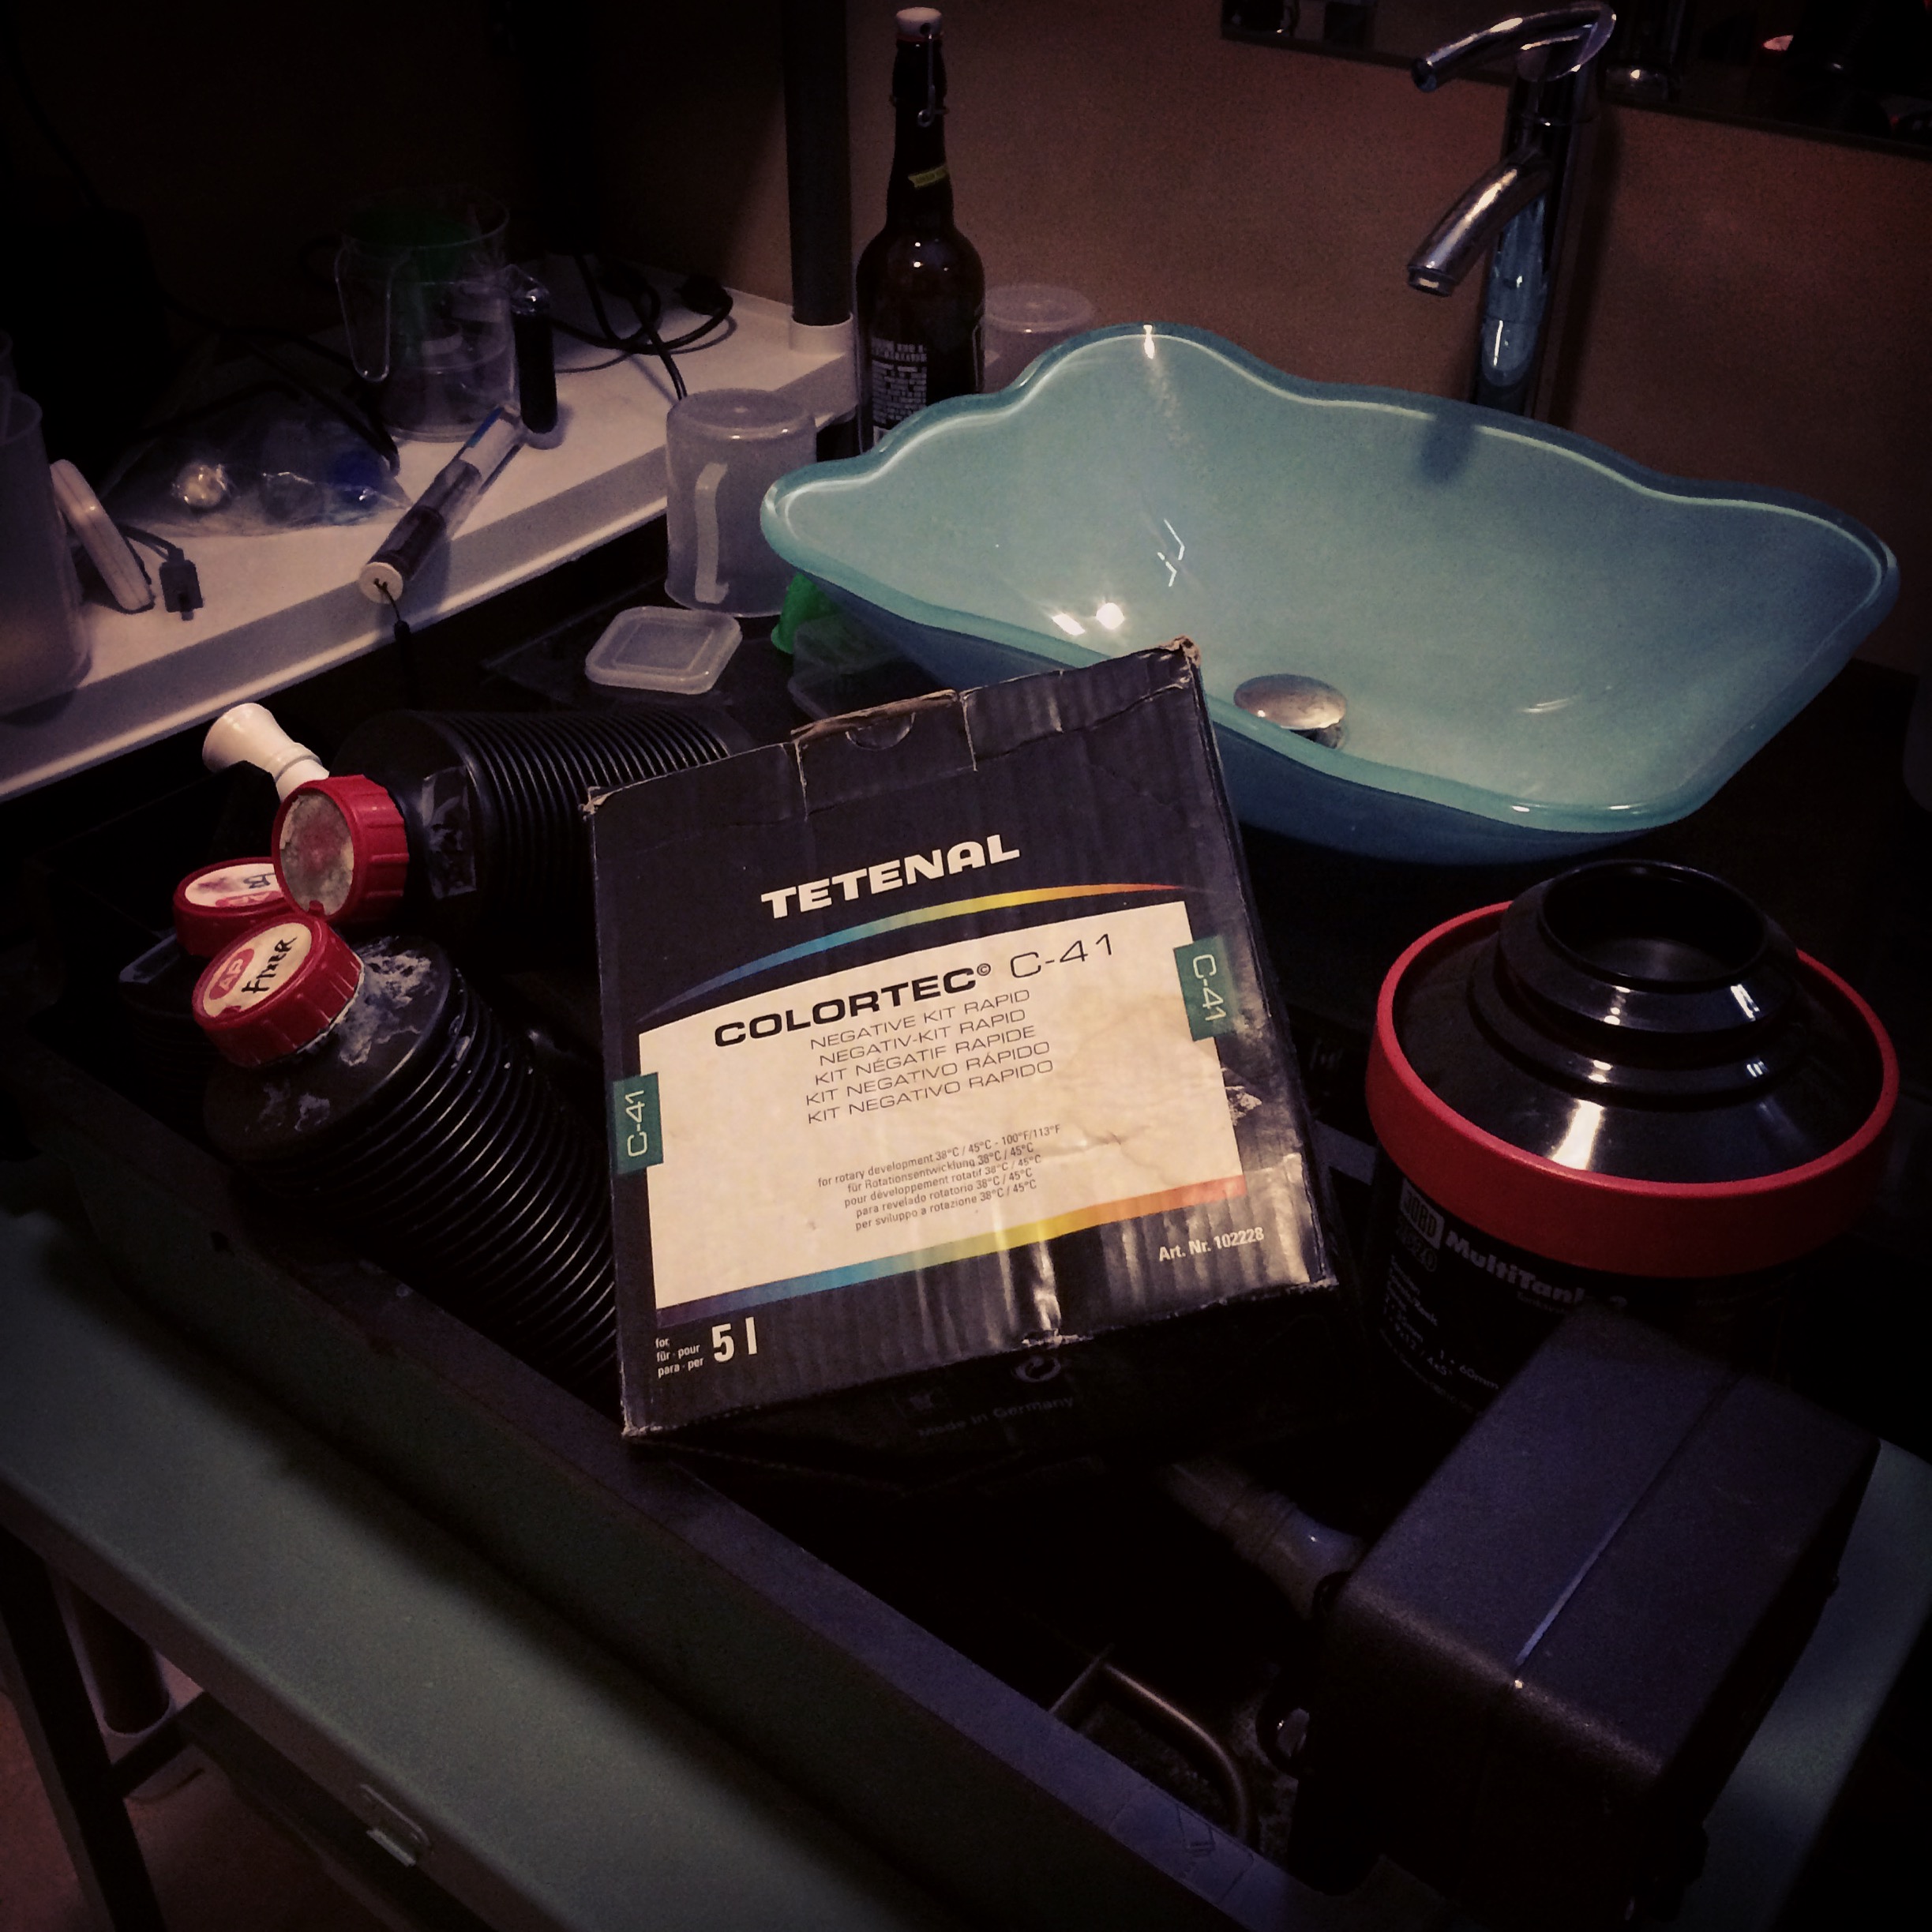
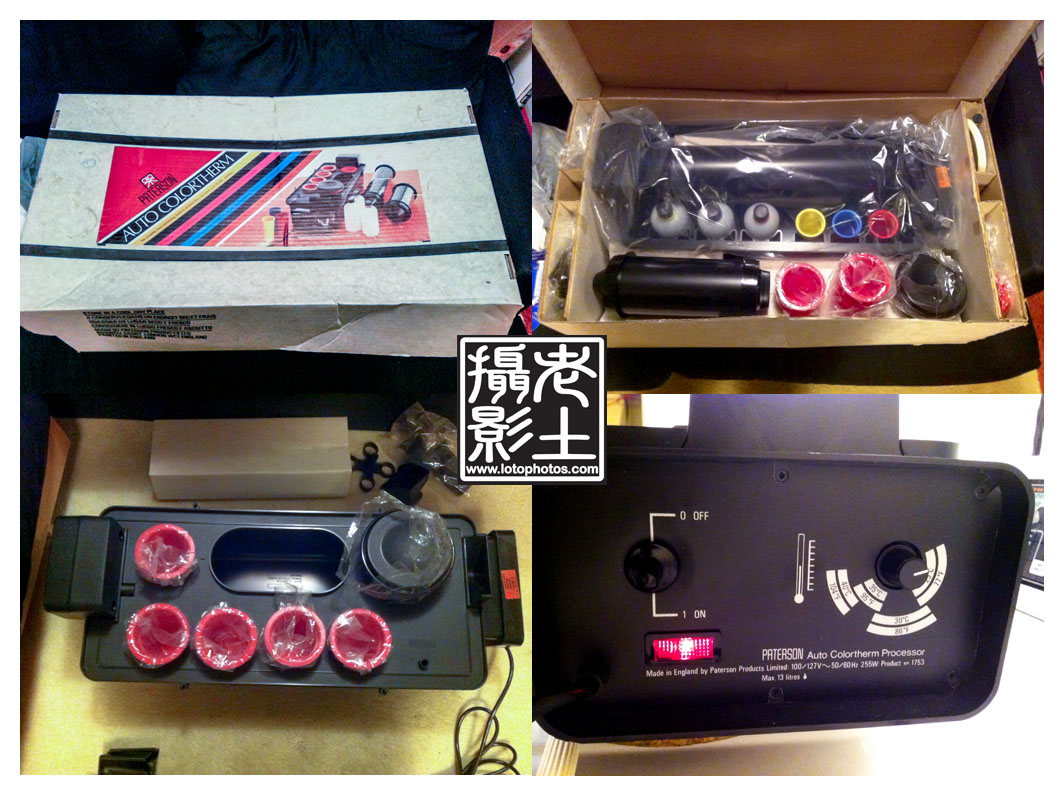
I got my Paterson Auto Colortherm machine from Toronto some time back.  I refitted it so that I can use the roller for my jobo tank.  I mixed the chemicals into its three parts and noticed a few things.  First, the clear blix mixture has a lot of residue at the bottom and was stuck.  I warmed it out, it helped a bit but there are still chunks of it at the bottom.  Second, the stabilizer bottle have merely 50mL left.  1L mixture required 100mL, what the heck, just mix it.

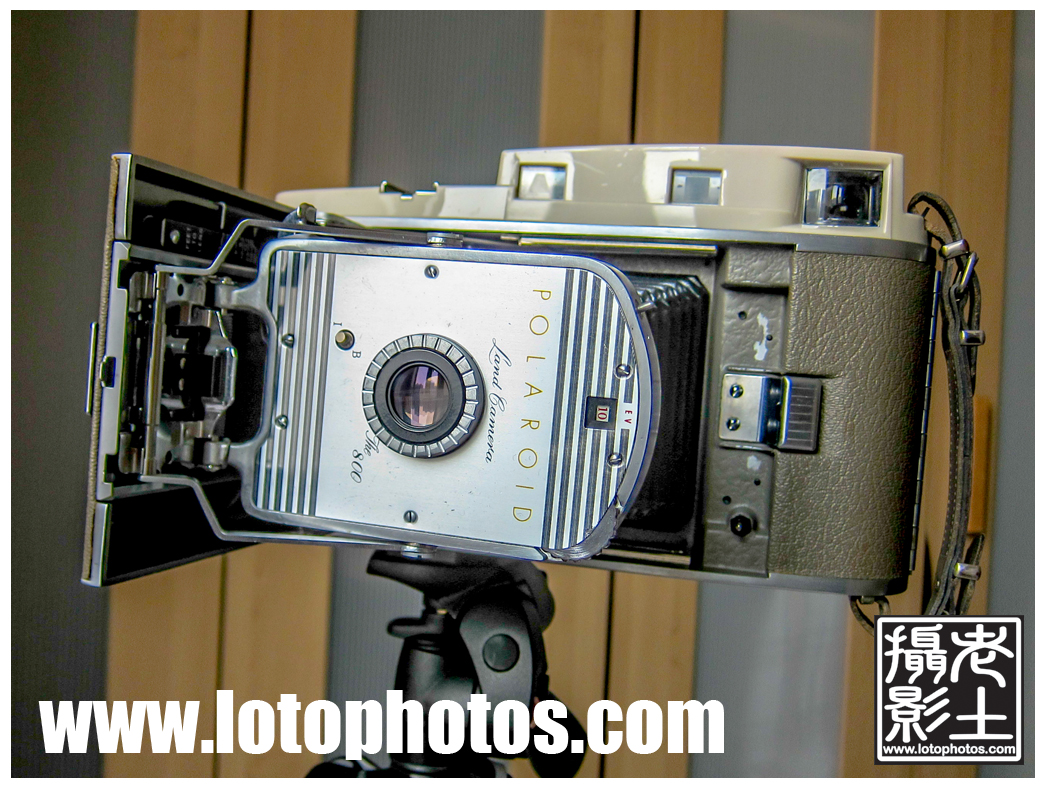
I took my Graflex SG with a Fujinon 400mm f8 lens on my roof for the test shots in one late afternoon.

Graflex speed graphic with fujinon 400mm f8

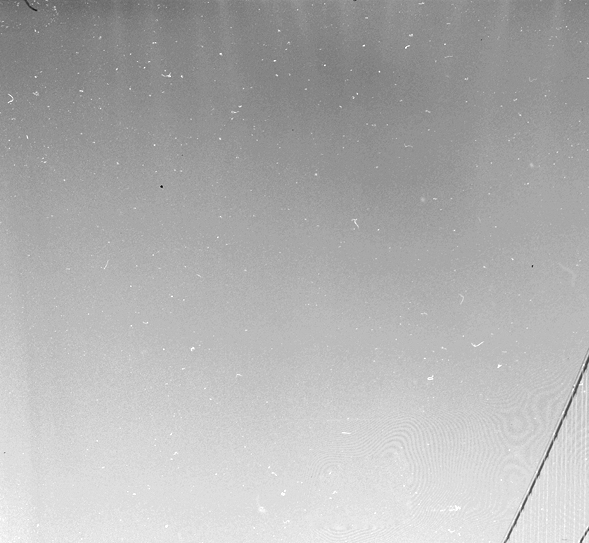
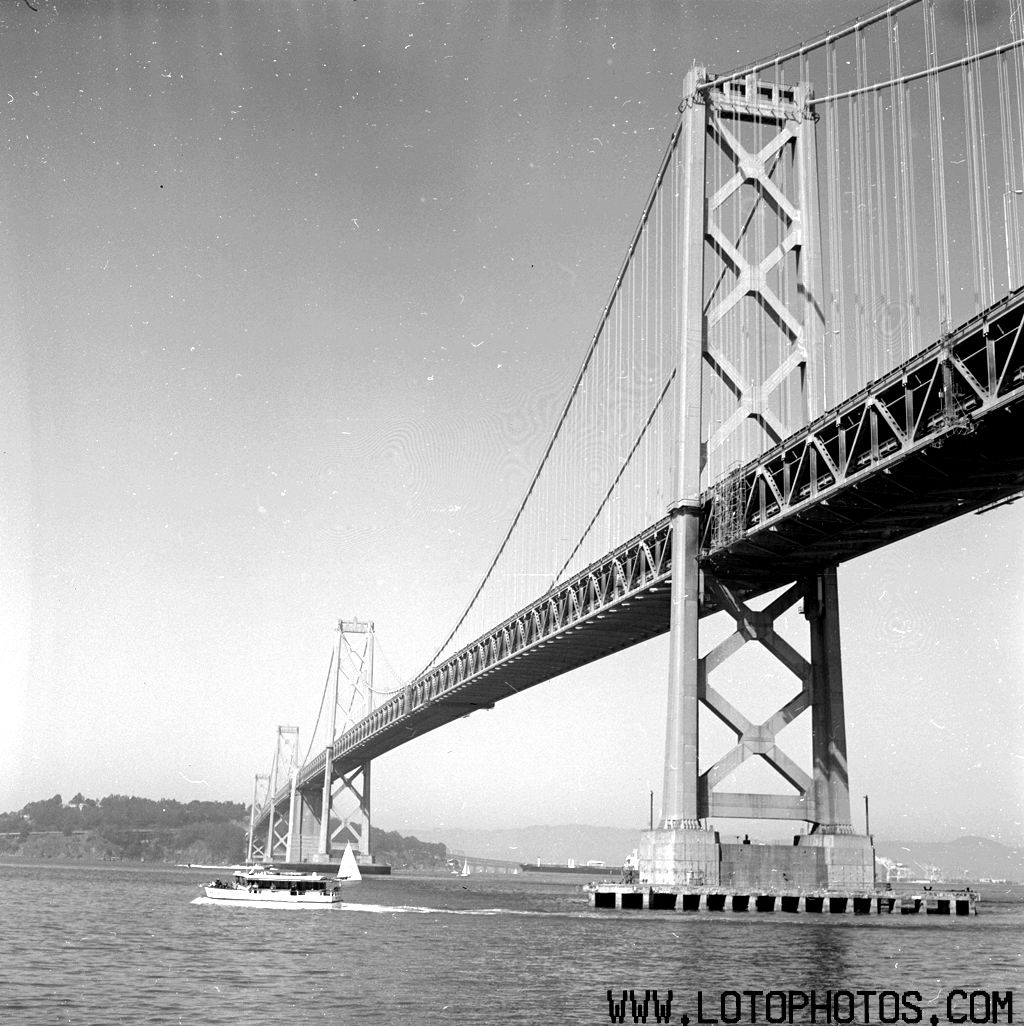
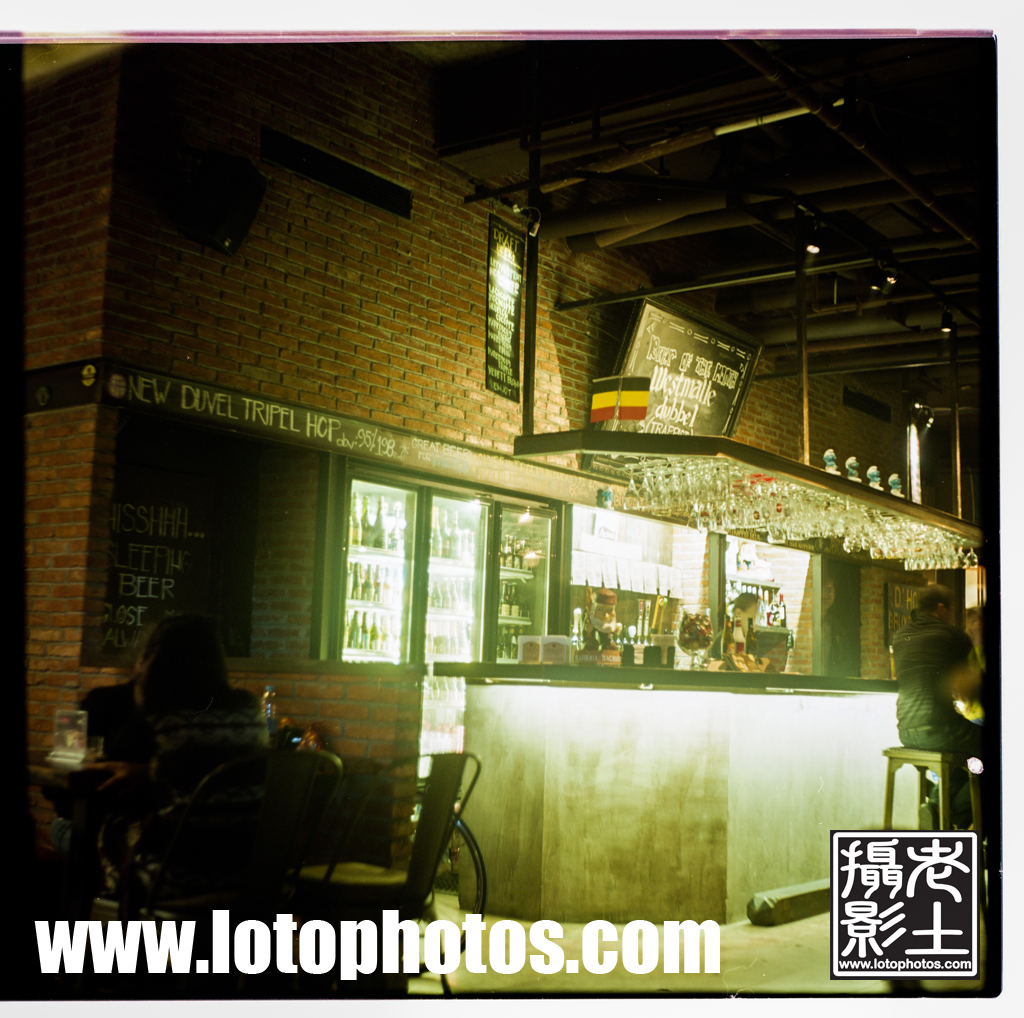
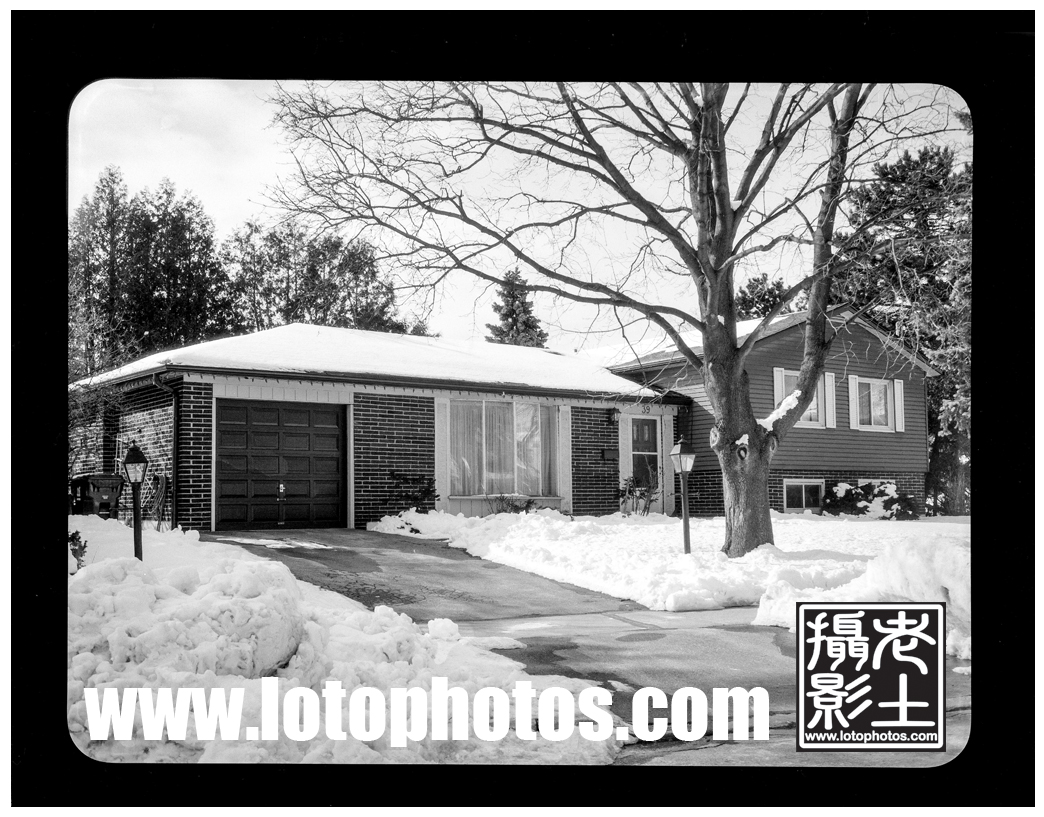
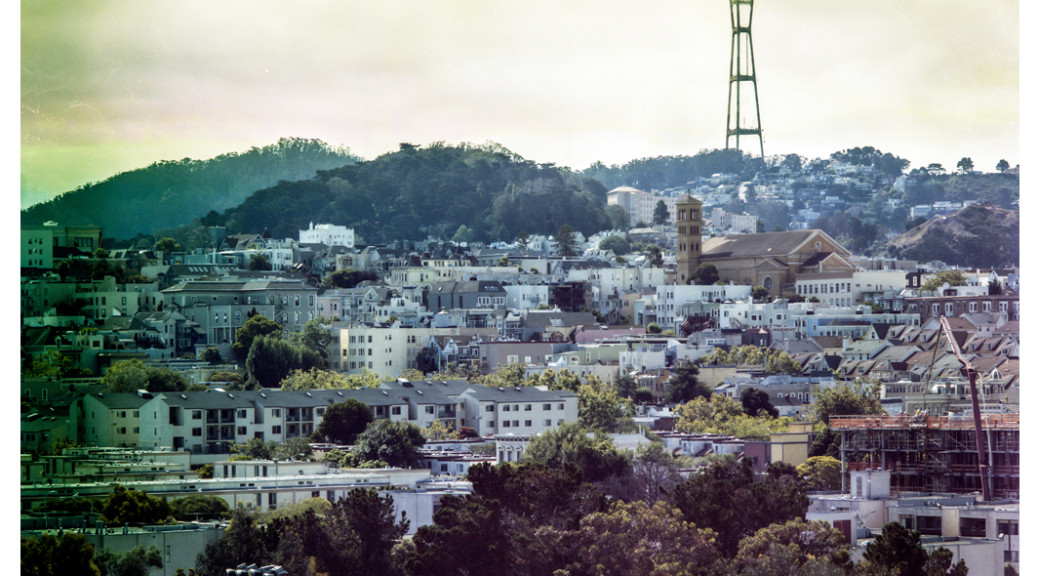
I shot the Kodak Porta 400 at ISO 200.  I developed the sheets slightly longer than the recommended times.  Developed 3:30min, Blix 5min.  When I opened the Jobo tank, I see images, solid images.  I scanned the negatives with my Epson Perfection V700.  The unedited result is shown here.

Expired Kodak Portra 400

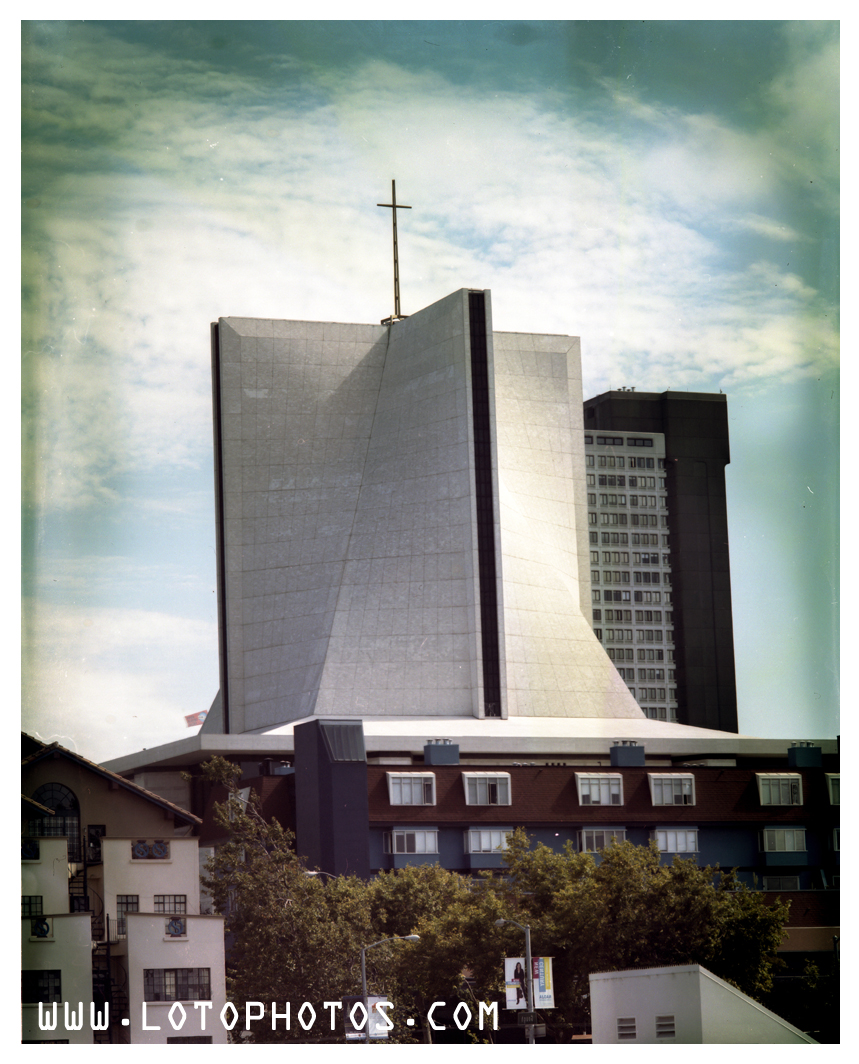
All the details are there.  The edges showed some funky chemical gradient that made the image looked like something out of a roll of lomography film.  The overall look of it is vintage and reminded me of a postcard from the 60s.

Overall, I am happy with the result and I guess I will develop many more sheets with the Tetenal kit before it runs out.


Dust – number one enemy

I have been developing for quite some time now in my darkroom (aka my washroom) and I usually just hang them dry without much thought.  I do get dust in my negatives.  I do see them in my scans.  I know it exists but subconsciously, I just ignored it.  Scott Stillman referred this as the “power of positive thinking”.  This was sort of what I did until one day I opened Pandora’s box.  I was developing in my parents’ basement in Toronto and the nightmare started.  Check out this scanned negative (no processing).

Dusty negatives developed in an open environment

Let me zoom into the left corner.

Dust, dust, dust!
Dust, dust, dust!

This seemingly good photo is ruined.  The dust particles simply took over the photo and no software can fix this easily without losing some resolution.  I was not happy about this and decided to do something about it.  I researched online and saw different methods to battle dust.  The professionals have drying cabinets and built in heaters.  Due to space and wallet constraints, those solutions were not possible.  I then decided to create my own.

sock drying rack, wedding gown plastic cover, distilled water

I bought a sock drying rack, a wedding gown plastic cover and a bottle of distilled water.  I will use the distilled water in the final photoflo bath so that my negatives will be mineral/ion free.  I then fitted the sock drying rack inside the gown plastic cover and realized that it was too small.  I upgraded to a larger sock drying rack.  This rack cost $10USD (it’s made of metal!) and the gown cover cost around $3USD.  The 4.5L of distilled water was around $3USD as well.  This solution’s total cost was around $16USD.

Upgraded sock drying rack

It fitted like a glove inside the gown plastic bag.

Fits perfectly!
Fits perfectly!

Now putting it into action.

Dust cover in action.

I scanned the roll of 120 and was impressed with the result.  I will not say it’s dust-free but comparable to the ones that I get back from a professional lab.  I think I have solved my dust issue! and it didn’t cost me an arm and a leg at the end.  Check out this unprocessed scan of one of negatives.

Almost dust free negatives!!!


Pushing Shanghai GP3 to 400

Taken with Mamiya Universal + 50mm f6.3 lens + 6×7 film back.  Developed Rodinal 1:65 stand 2 hours. First two minutes agitation, then one flip at 1 hour mark.  Fixed with Kodak rapid fix.  Scanned with Epson Perfection V700.

The result was not bad at all, this photo taken on Peel St. Central, Hong Kong.

Pushing Shanghai GP3 to 400

First Shot at Stand Development

A recent discussion with Kirk Lau with the boiling water temperature of our taps converged on the topic of stand development.  Basically stand development involves throwing away everything that I have learned so far about film processing.  Stand development is simply develop your film in diluted developer and after initial agitation, leave it to develop for (almost) infinite time.  You rely on the amount of chemical to natural develop your film, rather through agitation.

I still have six rolls of Tri-X 400 that I snapped in Japan back in June that still need to be developed.  I haven’t done so not because I am lazy but recently in the development with HC110 dilution H, the grain size appears to be large.  I suspect the culprit is the water temperature.  Both the tap water in Hong Kong and Shanghai measured to be well above 28C.  Even though I have compensated that with less development time but the grain size seems larger than before.  I am holding onto these rolls until I figure out what’s wrong.

I attended Herbert and Elaine’s wedding ceremony recently and prepared to shoot the event with my Canon QL17, my Canolite D flash and a roll of Kodak Tri-X 400.  The idea of stand development came back to me after the shoot and I figured I will give it a shot.  I developed the Kodak Tri-X with Kodak HC110 (1:100) dilution.  I did initial agitation of front, back, left, right, each 10 times, then gave the tank a good tap on the ground to avoid any possible bubbles.  I then left it to develop in 25C room temperature for 60 mins, followed by a 5 mins water bath.  Then I fixed it in Kodak Rapid Fix for 4.5 mins before rinsed in water again and wrapped it up with Kodak Photoflo.

The result was mostly successful.  The film developed fine except again for the large grain size.  I blame it on the tap water temperature again.  I need to put in ice and prepare the developer and rinse water to be around 20C next time! Nevertheless, the shots at the wedding ceremony was super loto and turned out super classic!  Totally reminded me of the ones in the dusty wedding albums of my parents.

Super classic!
Super loto, super classic!

C-41 Color Development

Breaking free from the many issues I had with photo development places in Hong Kong and Shanghai, I started to develop my own film again recently.  I have done a lot of BW development in the past.  Color, however, I have never done before and had always been at the back of my mind.  A temperature controlled water bath (at 38C) for the chemicals is a must for color.  When I was back in Toronto, I was lucky enough to find an unused Paterson Auto Colortherm machine from a really nice lady named Linda Power.  It was sitting in her basement for years and she was willing to let it go.  I was ecstatic about the find and it just barely fitted in my suitcase back to Hong Kong.

Paterson Auto Colortherm machine

It was rather difficult to get home color development chemicals in Hong Kong, so I picked up a C41 Tetenal kit from Shanghai.  It was not cheap but nevertheless a good practice kit for the first run at this.  My Paterson tank can develop up to two 135 rolls or one 120 roll with about 600mL of chemicals.  I prepared the developer, blix and stabilizer all at 600mL volume.  With this, I can either develop 4 to 5 rolls of 120 or 8 rolls of 135.  With the 5L kit I got, I basically can develop about 64 rolls of 135.

I turned on the Paterson Auto Colortherm and set the water bath to the correct 38C temperature.  You need to wait about an hour until all the chemicals are at the stable temperature.  I started with a 5 minutes water bath, then developed for 3 minutes 15 seconds, blix for 6 minutes, water rinse for 3 minutes and ended it with stabilizer for 1 minute.  Viola, the negatives showed up nicely and I waited for them to dry.
I scanned them with my Epson V700 and they turned out great.  However, dust is never my friend when it comes to development and scanning and a lot of care has to be taken.

C41 Development with Paterson Auto Colortherm

Here are a couple of shots from the development.

Shanghai Jingan Mansion, Fuji GA645Zi, Fuji Reala 100, C41 Tetenal Self Develop, Epson V700 Scan
Shanghai Jingan Mansion, Fuji GA645ZI, Fuji Reala 100, C41 Tetenal Self Develop, Epson V700 Scan
Shanghai Kaiba, Zeiss Ikon Super Ikonta 532/16, Fuji Superior 100, C41 Tetenal Self Develop, Epson V700 Scan
Shanghai Kaiba, Zeiss Ikon Super Ikonta 532/16, Fuji Superia 100, 30 sec exposure, C41 Tetenal Self Develop, Epson V700 Scan

Overall, the first run at C41 development was a success and am looking forward to develop more rolls.


Polaroid Land 800

Polaroid Land 800
Polaroid Land 800

Polaroid Land 800 and Shanghai 4×5 film

These cameras were produced from 1957 to 1962. Since the disappearance of roll film in the 90s, this camera had been abandoned as trash since.

I picked up a couple of these units when I was back in Toronto a few months ago. Both were in perfect condition and all the accessories  intact. This camera features an EV lighting system with fixed aperture and shutter speed.

The pairing is as follows:
EV 10 f/8.8 1/12
EV 11 f/8.8 1/25
EV 12 f/8.8 1/50
EV 13 f/8.8 1/100
EV 14 f/12.5 1/100
EV 15 f/17.5 1/100
EV 16 f/25 1/100
EV 17 f/35 1/100

Initially getting these two cameras, I wanted to modify it so that I can use it as a medium format panoramic camera. I wanted to put in a roll of 120 and see if I can get 6×10 or 6×12 shots out of this.

Walking in the camera market in Shanghai prior to my trip back to Toronto, I saw some really cheap Shanghai 100 ISO 4×5 film. Doing medium format for years, I am always itching to move onto large format. So I picked up a box of el cheapo Shanghai 4×5 film and off I went.

Honestly, it’s a pain to insert the 4×5 film into these Polaroid 800 cameras in a dark bag. Basically, I have to do this once for every shot. This work flow is extremely not portable, but hey, reminding myself, it’s large format, it’s not supposed to be that portable.

On this camera, there are two viewfinders, one for focusing and one for framing.  I was impressed with the rangefinder.  It was crisp and accurate and with a maximum aperture of only F8.8, I experienced no focusing issues.

My first two shots with this camera, however, was a disaster. The photos came out totally underexposed. This can be traced back to two mistakes I made. First, I used the Polaroid light meter that came with the cameras. Bad call. Second, reading in the many forums, a lot of people are over exposing this film and shooting it like a ISO 50 film.

The second and third trials got better and basically I needed to overexpose the original settings by about 1.5 EVs.

Polaroid Land 800 and Shanghai 4x5 ISO 100 Film
Polaroid Land 800 and Shanghai 4×5 ISO 100 Film

The details were amazing.  The Polaroid land 800 has a mask with rounded corners.  The exposed area of of the photo is not 4×5 but a bit smaller than that.

My film development process.  All chemical temperature @20C. Water bath one minute.  Guan Long (冠龍) D76 1+1 14 minutes.  Water Stop Rince 3x + 2 mins. Guan Long F-5 Fix 8 mins. Water Rince 3x + 2 mins and Kodak Photoflo.  Scanned with Epson Perfection 4870.

The first experience with the Polaroid Land 800 was quite successful and I finished the whole box of 25 shots in within the first two weeks.

Why Polaroid Land 800? Simple. It’s cheap, readily available, full manual and has no electronic components.