Not only can Polaroid land cameras produce an instant print, with the wonderful modern technology of scanning, the once throw-away negative can now be processed into a digital photo. For Fuji FP-3000b, the negative is actually a paper negative. There is no need to do anything with it, simply let it dry and you can scan it on a normal positive scanner. However, I had a lot of issues with these negatives, as it is virtually impossible to keep them dust free. They had to be laid flat or the chemicals (also called goop) will slide around and distort the image. The only reliable way to keep this as a useable negative is to blow dry it immediately after peeling, which proven to be difficult in the field.

See the above photo, the goop moved around and you can see clearly the straight lines are bent. The clock arms also disintegrated. The FP3000b negatives are quite unpredictable.
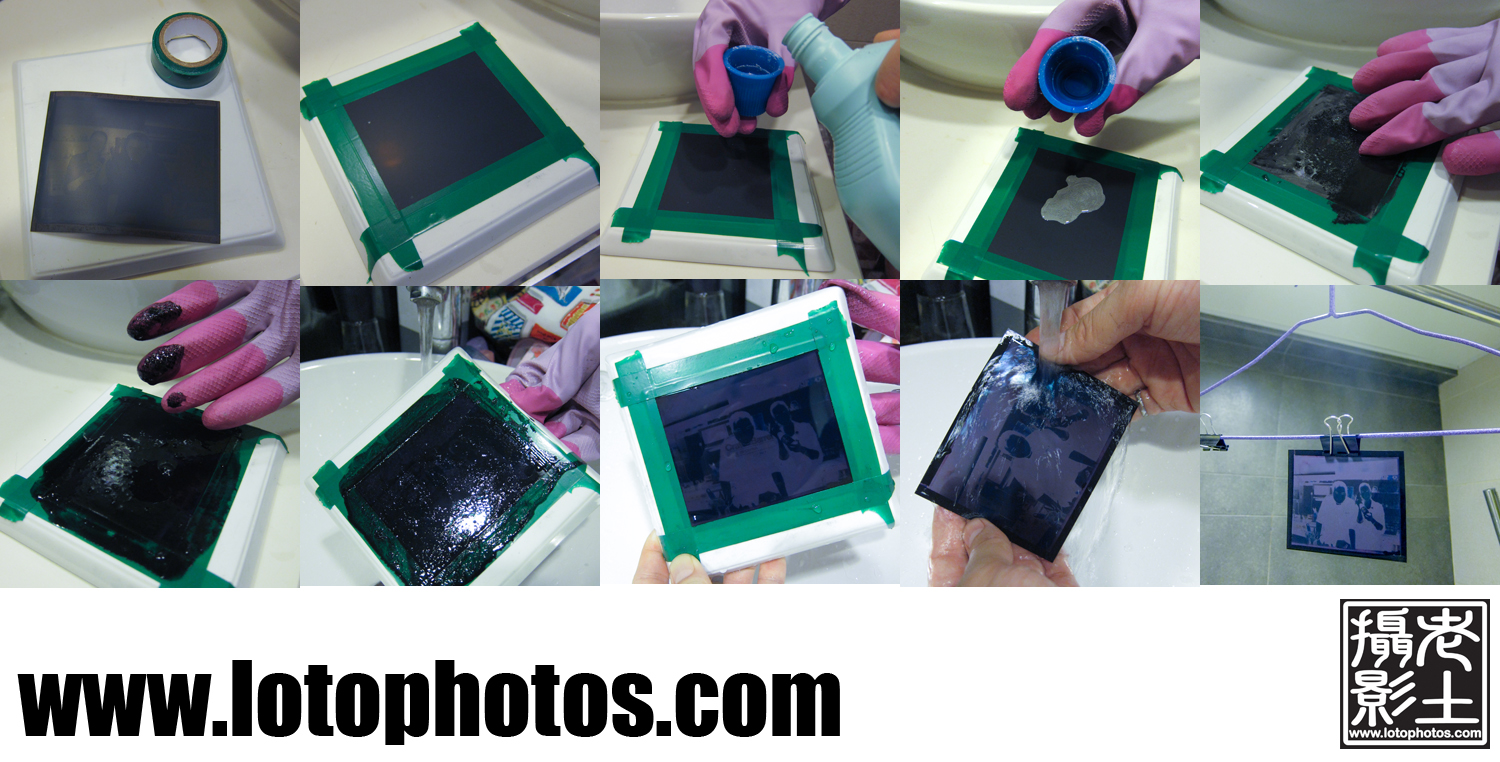
FP-100b film however is a different technology. The negative is actually plastic. They hold up a lot better than its FP-3000b counterpart. The goop however sometimes will continue to develop and all sort of wonderful things (depends how you look at it) like color distortion or image fuzziness will occur. Like FP-3000b, one side is the goop but the other is an opaque black dark side. Both of these sides had to be processed before you can scan this on a negative scanner. If you look online, there are many ways to do this. Below is my version of it, shown in the photo below.

1. Wash the goop off the negative with clean running water, then you will need two things, a piece of tile and a roll of electrical tape.
2. With dark side up, tape up the four sides nicely (make sure no leaks).
3/4. With care, pour household bleach on the dark side.
5. Spread the bleach completely over the dark side.
6. Wait for a couple of minutes and the black nasty stuff will come off.
7. Wash the nasty black stuff off with running water.
8. With the black stuff washed out, you should be able to see a clear image in the negative.
9. Take the negative off the tile, wash thoroughly with water.
10. Hang the negative to dry.
Since the negative is huge (3.25″x4.25″), most negative scanners won’t be able to process this. Before I got my Epson V700, here are two ways how I digitized my negatives. The first one is to put the negative on your window during the day and use your digital camera to take a photo of it. The other is to place the negative on a positive scanner with a piece of white paper on top, shine a big lamp on it and scan. Both of these methods will then require some post processing work in some kind of photo utility for color inversion.
Here is an example result from my work flow. The happy campers are Ayuchi and Billy at the Sake Bar Ginn in LKF.